FEMME FATALE BEAUTY


Past Icons of the Femme Fatale look:

Marlene Dietrich

Rita Hayworth
Current Icons:

Angelina Jolie

Dita Von Teese
The Key rules for a Femme Fatale look are:
-          Strong clean brows, pencilled in to make stronger and more defined.
-          Rich reds and plums for deep and sultry full lips.
-          Dark greys and smokey blacks for dramatic seductive eyes, framed by an equally strong brow.
-          Keep shadows well blended and soft to avoid a hard look.
-          Keep skin colour warm so the dramatic eyes and lips do not leave the face looking pale and drawn.
-          Apply lots of mascara to frame the eyes.
-          Matte skin.
Now you have the key rules to keep in mind whilst trying to create your Femme Fatale look you can follow these steps to creating your finished look:
1)   Prep skin with moisturiser and/or primer; a primer will leave skin looking flawless against the strong lips and eyes which will hold the most attention. I used a Body Shop primer for dry skin as my model had drier skin at the time; other great primers include Laura Mercier Foundation primer or L’oreal Studio Secrets primer.
2)   Do not start with foundation and concealor, but use this after doing the eyes as you may create fallout from applying dark shadow to the eyes.
3)  Starting on the eyes, use a dark smokey colour to deepen the socket, use a flat compact brush to really push the product into the skin. Do not go too far past the socket line. Make sure you take this colour down under the eye, tracing the whole lower lash line, creating that deep smokey look. Do not worry about trying to keep it neat and tidy or well blended as you will blend the colour out in the next steps.
Try to use shadows that have pigment or a metallic shimmer; these will pick up the light and help to create a softer sultrier look.
I used MAC ‘humid’ eye shadow for this first step.
4)   Using a slightly lighter shadow fill in the middle of the eye and blend the colour into the socket colour using a fluffy blending brush. Make sure to now blend the previous colour so there are no hard lines and the shadows all merge into one.
I used MAC ‘club’ eye shadow for this.
5)   Finish the shadow by using a shimmery/metallic/pigment all over the shadow already applied, this will add depth and set off the other colours, this could be a shimmery dark forest green or rich plum/brown, but something with a rich deep colour. I used a MAC pigment in ‘chocolate brown’ for this.
6)   Lastly, line the socket to add depth with a shimmery black, again using a soft and fluffy blending brush. I used MAC ‘black tied’ for this.
7)   Apply a couple coats of thickening volumising mascara, I used Clinique High Impact Mascara.
8)   Frame the eyes by pencilling in or using shadow to strengthen and define brows. Do not be afraid to use quite a dark colour as you want the brows to be a strong feature, keep them arched and clean. For the models hair colour I mixed a blend of MAC shadows in ‘embark’ and ‘carbon’.
9)   Then apply foundation, the foundation should be matte one as in the 1940’s when the femme fatale look was popularised by women like Marlene Dietrich and Rita Hayworth they would have been acting on screen a lot therefore needed matte skin so the camera did not pick up any shine. I used MAC Satinfinish for this, topped up with a heavy coverage of studio fix powder to remove any shine and set the foundation firmly in place.
10) Now add in your lip colour, using a rich plum or deep red. I have used a mix of Kyrolans Mini lip palette colours LC008 and LC010, plus used a MAC lip liner in ‘spice’.
11)  Make sure you finish by adding some warmth to the outer areas of the face by using a skin coloured contouring powder. Either a taupe of soft matte brown. Anything with too much orange will look fake. For this I used Marks and Spencer’s bronzing powder in ‘medium’ which has a very earthy colour rather than an orangey bronzy look.
12)  Lastly, create some strong cheekbones to toughen up the look by using an angled soft brush just under the cheekbone to create a depth and shadow. To achieve this I used a small amount of MAC eyeshadow in ‘omega’.

Testimonial Share

Hi Everyone,

I just thought I would take a moment to share with you a lovely testimonial that I received this week from a Bride earlier on in the summer.

'Frankie was recommended to me by a local bridal shop owner and after viewing some of her work online I decided to go ahead and book a hair and make-up trial with her. I had very specific ideas about how I wanted my hair and make-up done on the day and she seemed to understand completely the look I was going for and was able to suggest how we might go about creating it, she came with a huge make-up kit with every shade you could think of and took on board all my concerns about how my skin would look and feel and how we could combat any issues on the day. I was going for a vintage look so I wanted my hair to be done in a 20's style with very natural make-up and I was thrilled with how it turned out. On the day she was very professional and arrived ahead of schedule, she took on board all of the concerns we had and ensured that we felt comfortable and looked our best. I would highly recommend Frankie to any bride as she made me feel stunning on the most important day of my life.'

This weekend Illamasqua are holding more Beauty School Drop-In classes so make sure you make the most of these FREE classes and get down to Beak street, just off Carnaby Street, London. The classes run from 1:00pm onwards. 

http://www.illamasqua.com/explore/beauty-school-dropin/

Frankie

X

More tips on applying false lashes!

Hello all, this weekend I visited Illamasqua's headquarters again on beak street, London for some more of their brilliant free drop in tutorials...

On the agenda this time was the 'perfect pout', 'perfect blusher' and how to apply false lashes...


When the false lashes tutorial began I assumed it would just run over all the things I had heard before about how to best apply false lashes and that I wouldn't pick up anything new...
However I did pick up some new great tips that are going to help me massively in applying lashes...

The tips and tricks I picked up included the obvious trim to your eye width technique so you do not get an overhang...
Make sure you don't put the corner of the lash right in close to your inner corner as it will want to lift and then end up scratching the inner corner of your eye, plus if you start a third of the way in from the inner corner then you will get more of a fanned look creating bigger wider eyes...
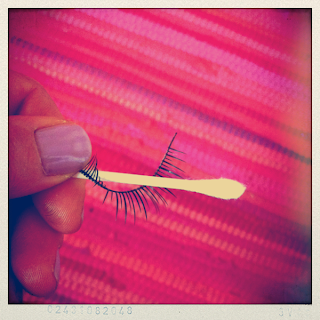
Another tip is to curl the lash by twisting it around a cotton bud to form a spiral shape that will drop and just leave a gentle curve to the lash, this is particularly helpful if you have a strip of lashes with a thick tough spine that is hard to make mold to your eye shape...
Other tips include letting the glue go tacky before applying lashes...
Using tweezers to place the lash on...
Lastly if you still struggle then why not cut your lashes in half and apply the lash in two stages making it easier to work with small sections of lash rather than getting the whole strip to stick down at one time...


I hope this helps as lashes are so popular these days plus very reasonable...if your going out this weekend then make sure you try some of these tips and see if it makes your life any easier!

X

Product reviews!

Hey everyone, I have two products I have acquired recently to review...

Firstly I will start with a sample mascara a received this month in my GlossyBox which was by Yves Rocher and called 'Sexy Pulp, Ultra-volume mascara'....
This costs £16.90 but on their website it is currently half price yey! making it currently £8.45, which is an absolute bargain, cheaper than a high street mascara...
Pick it up for this price right here...http://www.yves-rocher.co.uk/control/product/~category_id=2210/~pcategory=2000/~product_id=W87489?cmSrc=Category


The mascara is really reallllllly very good, and I have don't say that very much, its two best points are its brush shape and the consistency of the product...

the brush shape cradles the lashes, it is curved like the lashes and each end being wider than the middle allows you to without having to change the angle of the brush, catch every last hair and because the bristles are fine and dense you can easily catch all the lashes and coat each one rather than having to do alot of combing to get to each lash....

secondly It manages to give volume without making the lashes look a bit dry/fat/clumpy, the lashes look volumized but not so caked and full that they would scratch someone if they got too close! the Lashes still feel soft and as if there is not too much product on them...this allows for a more natural look with one coat and a more dramatic one with two...I also wore it to a all day party last weekend and applied it a couple of times during the day and it still looked flawless...

It definitely made my lashes look healthy and fuller, the only thing I would say is it was not particularly lightening but if you use a lengthening primer, such as you find on the doubled ended wands where one side is white and the other black then I found that helped give my lashes more length...

Overall a 8/10!


The second review is of Ciate's nail polish in purple sherbet...

The nail polish colour is gorgeous plus on trend ...I did have to apply two coats, but that is a good thing because I think you get a better colour and more staying power from two...
 The first coat is very sheer and it looks nice on it's own as a pretty lavender wash...but with two coats you get perfect coverage and a smooth surface...

You can purchase the product from their online store and it costs £9.00...

 Just to let you know that on the back of the bottle I use the colour was called 'purple sherbet' however having just been on their website they seem to have the exact same colour now as 'sugar plum'...but this is the same colour.


Overall a 7/10!

X

June Glossybox Products!

Hello everyone,

In the Glossybox this month was :
pic.twitter.com/S9mFy8Qr

pic.twitter.com/Of3cGI4n
pic.twitter.com/cq5am7OP
pic.twitter.com/PX7suJ1g
pic.twitter.com/Pkzpmm9A 

The Box only came yesterday so I have not had a chance to try all of the products just yet, however I did use the bareMinerals Bronzer in 'summer warmth' in my morning makeup routine and found it really very nice. The colour was matte, plus had a lot of payoff, so I did not have to use much at all to achieve quite a bronzed look.
My advice with it would be to use it sparingly for fair skin tones as it only comes in that one colour. 
if you are trying to achieve a quite bronzed contoured look my advice would be to start very gently and build colour very gradually as it was a dark colour with alot of payoff.  

In regards to the brush, it is always good to have more brushes and I always can never have enough but really I am not a fan of the free brushes or bonus brushes you get in gifts or in magazines for instance, they are never of very good quality and I don't know why but always smell really plasticcy and cheap!

The mascara shown in the top picture did not come in the box and I have called the company already and they will send me out my mascara at the first possible chance...

I am excited to try the Vichy Dermablend as uneven skin is something I suffer with my self so I will be sure to try it out this week and report back on whether it is any good at covering up scarring/pigmentation/uneven skin tone. 

Will get back to you shortly regarding the other bits in the box!


Summer product ALERT!

Hello!

I have just come across a product I have not seen before, it may be new or it may just be new to me so if you have seen this all before then I apologise...

A professional haircare brand called ALTERNA have designed a product called '1 night highlights', the product is a non-flaky mousse which comes in three shades to give you either golden/red or caramel highlights which can simply be washed out the next day...


You shake the bottle ans apply using the hairbrush like applicator on the end of the can, running it through your hair from roots to tips to create the appearance of highlighted hair...

The product costs £16.00 in most places that I have looked, however some places say a whopping £29.95! So perhaps shop around online to find the best deal, the product can be found from many online stores by typing in 'Alterna 1 night highlights' into Google...

 As the brand is Californian there are limited UK stockists but it is widely available online and lookfantastic.com provide free UK delivery... www.lookfantastic.com

SO.... do they work, is the product any good?

The general answer is that yes the product works really well, and if you are looking to just try out a style or go for a different look without going permanent then its perfect! The product does do exactly what it says it does and looks really good...

The only thing that could be a problem is using this product when you are going to curl your hair as the brand suggests you use hot hair tool BEFORE application, so if you were going to curl your whole head you would have to then apply the mousse after you have done all your curl, and applying the wet mousse and then brushing it through may damage what you did in terms of styling...
So in this case it may be better to go for a straighter style when using the product...

Overall its a really great idea, and particularly the blonde colour for the summer if you just want to brighten up your hair for a day or a night!

X